Using the “Copy Cage” Feature in Realize Shape
TATA Technologies - Eric Bansen | August 5, 2015 | Comment
With Realize Shape open and a part prepared, users can see their cages and cage faces. The Copy Cage feature itself can be found under the “Home” tab within the “Create” group. In case a user doesn’t see the Copy Cage feature within the Create group, select on the arrow in the bottom right of the group. Within the dropdown menu that appears, make sure that Copy Cage is checked on.
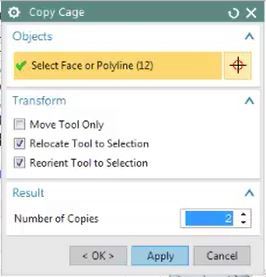
When selected, the Copy Cage window should appear.
To use Copy Cage, first select a face or polyline. Users can select as many faces or polylines as they want. The faces selected will highlight automatically.
Once a user has selected their faces, they can move the cage manipulator in the direction in which they want to place their copy.
If during this process a user decides to have additional copies of their cage, simply increase the number of copies displayed in the Copy Cage window. These new copies will appear equidistant from the first in the direction in which you’ve dragged the first copy.
About Author


Eric Bansen works as a technical consultant for i GET IT. Focusing on online e-training for engineers using Siemens NX software, Eric has created numerous online training courses for i GET IT in both text and video format. Eric worked in manufacturing as an Industrial Designer and Design Engineer in the automotive and product industries for 17 years.
Latest Tutorials
- 3D Shape Basics in Fusion 360
- Fusion 360 Sketch Basics
- Running a Parametric Study and Analysis in SOLIDWORKS to Create a Flow Simulation Project
- Calculating External Flow around a Sphere in SOLIDWORKS
- How to Add Heat Sources in SOLIDWORKS
- Working with Macros in SOLIDWORKS Electrical
- Creating Locations in SOLIDWORKS Electrical
- Linking Sketch Blocks in SOLIDWORKS
- Inserting Fluid Subdomains in SOLIDWORKS
- Inserting a Porous Region and Running an Analysis in SOLIDWORKS
Content Providers