Range FinderStaff posted on November 09, 2006 |
Range Finder
|
This simple range finder will allow you to measure distance to stationary objects with fair accuracy. You will need:
|
- 2 small mirrors, app. 1 inch by 1 1/2 inch (25mm x 40mm)
- Piece of stiff cardboard, at least 4" x 2" (100mm x 50mm)
- Piece of wood app. 3 in. wide, ½ in. thick and 1 foot long (80mm x 15mm x 300mm)
|
 |
The glass mirrors should be as thin as you can find them in order to avoid double reflections from the glass. Ideally, you should use surface coated mirrors, but for this simple project it isn't really necessary. Place one of the mirrors flat with the silvered side up. Draw a line dividing the mirror in half horizontally. Place a metal or metal edged ruler along this line and scrape away the silver from half of the mirror with a sharp razor, being careful not to gouge the glass (or your fingers!) When you finish, you should have a piece of glass that is mirrored on the top half and clear on the bottom half. Do not scrape the other mirror.
|
Using a drawing compass, draw two circles the same size on a piece of stiff cardboard. Their diameter should be slightly longer than the length of the mirror. Cut them both out. On one of the disks, draw a line across the center (use the hole made by the compass point as a guide). Then draw two more lines to either side of the first one. The distance between these two lines is the same as the thickness of the mirror. Draw a circle slightly larger than the size of the thumbtack directly in the center of the same disk. Now cut out the space between the two outer lines and cut out the smaller circle. The two pieces form a split disk to accommodate the mirror and the thumbtack.
|

|
Take a piece of wood app. 3 in. wide, 1/2 in. thick and 1 foot long (80mm x 15mm x 300mm) and set it on a flat surface so that one of the 3 in. sides is pointing up. Using the thumbtack, poke a hole near one end, centered with the width of the board and approximately half of a mirror's width from the end. Remove the tack.
|
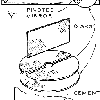
Glue the split disk to the other disk, making sure that the outside edges are even and that the mirror groove is even as well. While the glue is still a little soft, push the thumbtack into the center of the bottom circle (from the top). Set the unscraped mirror vertically in the slot of the disk. Use a few straight pins to keep it straight and in place. Cement the mirror in place by running a bead of appropriate glue or epoxy on each side. Allow to dry thoroughly.
|
Mount the disk onto the wood by pushing the thumbtack into the hole you made earlier. The mirrored surface should point down the long end of the board. Make some sort of index marker for reading distances. This needs to be adjacent to the disk and centered on the width of the board (see illustration). It can be as simple as a mark made on the board, or, preferably, a small metal pointer can be made that bends over the edge of the disk.
|
Near the opposite end of the board, draw a line at a 45-degree angle to the edge. Cement the half-scraped mirror upright along this line with the mirrored side on top, generally facing the other mirror.
|
To use, turn the rotating mirror so that it is at a roughly 45-degree angle to the board. Look through the clear part of the stationary mirror at some vertical object. Rotate the other mirror until you can line up the reflection of the object with the view of the object in the clear area.
|
You will need to work with known diastases for calibration. Set the range finder flat on a solid surface so that it is ten feet from some vertical object. Look through the clear glass and turn the rotating mirror until the reflection of the object aligns with the view through the clear glass. Mark the place on the disk where it contacts the pointer as 10 feet. Repeat for other distances up to 100 feet or so (of course, use meters if you are using metric). Once calibrated, you can use the range finder hand held.
|
| Once you have learned the basics of how one of these is built, you can build a more finished and sturdy version. Here are a few hints: |
- Old radio volume knobs (or new ones purchased from an electronics shop) make good mounts for the rotating mirror, provided a slot is cut to accommodate the mirror.
- Use a housing to avoid extra reflections. You will need openings on both sides of the fixed mirror and on the reflecting side of the rotating mirror.
- Although it can be made much smaller, a range finder with a very long base will provide much more accurate readings for longer distances. You will need to add some sort of belt and knob system to rotate the mirror; make sure your calibration marks are on the mirror, not on the knob that turns the belt, as slippage and stretching of the belt will effect the knob's rotation relative to the mirror's.
|
Images and article featured on this page were obtained from Bizarre Stuff.
http://bizarrelabs.com/