 |
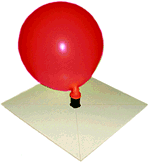
This hovercraft is capable of almost frictionless flight across a smooth surface. You will need an over-size balloon (12-16 inches), a 12" x 12" piece of foam core, a plastic film container, and some bathroom caulk. Cut the foam core into a square about one-foot on each side and mark the diagonals to find the center. Place the film container over the center and trace a circle around the bottom of the container. Use an Xacto-knife to carefully cut a hole that exactly fits the film container. |
|
Check the foam core to see which way it curls. You want the curl up so that the edges are higher than the center when the foam core is resting on a flat surface. Press the film container into the hole so that the bottom is even with the bottom of the foam core. Run a bead of silicone caulk around the container where it enters the foam core and let it dry for 24 hours. The container should be flush with the bottom of the foam core and form a smooth surface.
|
Drill a 3/32-inch hole in the bottom of the film container and stretch the balloon over the top. Blow up the balloon through the bottom of the film container and pinch off the stem with your fingers to prevent the air from escaping too soon. Place the foam core on a smooth surface and give it a gentle push. It will glide effortlessly. If the surface is somewhat rough, you will need to enlarge the hole. A 5/32-inch hole was about right for the linoleum floor shown in the picture.
|
You can experiment by using a smaller piece of foam core or trimming an inch or two from each edge of the large piece. Try different size holes to observe the effect. If the hole is too large, you can try placing cellophane tape over the bottom of the film container and cut a smaller hole in the tape. When everything is operating properly, the hovercraft will take off and flit in different directions on its own.
|
This article was written by William Kolb, who would also like to credit Suman Grandhi, Armando Morreale and Amy Ng of Carnegie Mellon University for the original idea.
|
Foam core is also commonly known as foam core illustration board or foam board - ed.
|
Another version
|
| Charles Hoover adds: |
"As a child (and more recently helping my nephew with a science project) we used old, worn out LP albums for the body of the hovercraft and glued drink bottle lids to the hole on top (the tops of water bottles- the kind that snap open- worked best for us). With a full balloon they would glide an impressive distance despite the weight of the LP, showing the lifting power of the air."
|
Thanks, Charles!
|
A bigger hovercraft
|
| Materials: |
- one-half sheet of 3/4" plywood
- an electric or battery-powered leaf blower
- 12 feet of foam pipe insulation
- a sheet of heavy plastic larger than the plywood
- a pipe connection to match the nozzle on the air supply
- contact cement
- staple gun
- electric drill
- skill saw / jig saw
- plastic can lid
- a 1 inch long 1/4 bolt and nut.
|
Procedure:
|
- Cut the plywood into a circle with a diameter of 3-1/2 to 4 feet.
- Drill a 1/4 inch hole in the center of the plywood.
- Cut a small hole about the size of the opening on the air supply nozzle (approx. 2") about halfway between the center and the outer edge.
- Glue the foam insulation around the outer edge as a bumper.
- Cut the plastic sheet into a circle large enough to cover the bottom of the plywood and fold over the insulation.
- Lay the plywood on top of the plastic, fold over to the top, glue and staple the plastic to the top so that no air can escape. Make sure to leave some slack in the plastic so that it hangs down beneath the bottom of the plywood. You want a "bag" underneath the platform that will fill up with air and lift you up when in operation. I used an aerosol adhesive to glue the plastic down on the top of the wood, and then I also had to staple the heck out of it to keep it down when in use.
- Attach the pipe connector to the top of the board over the two-inch hole.
- Five or 6 small holes (approx. 1-1/2 ") holes are then cut in the plastic covering the bottom. Make sure that none of the holes line up with the hole in the board. The holes should be evenly spaced and about halfway between the center and outer edge. If you wish to change the size or position of the holes, simply cover the old hole with duct tape.
- Poke a hole in a plastic coffee can lid and push a one inch long 1/4 inch bolt through the hole. Push the bolt through the plastic, then through the center hole in the board. Fasten with a nut. This will give a billowing doughnut effect to the plastic. If the bolt protrudes too far, cover it with tape or rubber stopper. This part required the most repair and modification when I tested my craft, but the hovercraft won't work well without this "doughnut effect" so just suck it up and do whatever it takes. When in use, the plastic may tend to rip out over this plastic lid, or the entire lid may tear. I used a whole bunch of duct tape to secure the lid to the plastic around it and in the end I wound up stapling the lid to the board.
- Attach the air supply. Use duct tape as needed to improve the connection.
- Take your seat and turn on the air supply. You may have to shift your weight so that the plywood is level. If the board is leaning, the hovercraft may experience too much friction.
|
Principle Involved:
|
| The hovercraft will ride on a cushion of air, reducing friction substantially. Depending on the air supply, it is possible to lift several hundred pounds. |
I bought all the materials at Home Depot, including a high-power electric leaf blower and a 100-ft extension cord to give the hovercraft some range. The leaf blower I bought was actually too powerful on "high" so I use it on the "low" setting. On "high" it kept causing the plastic to pull out from the staples. For the pipe connection, I just searched through the connectors by the PVC pipe section of the store and found something that would roughly fit the blower nozzle (with all attachments removed from the blower).
Images and article featured on this page were obtained from Bizarre Stuff.
http://bizarrelabs.com/ |